Procedural generation has been around for quite some time in video games, dating back as far as 1978 with rogue-likes.Procedural generation allows for game engines to create content from scratch based around a set of rules and parameters, then builds worlds/levels/geometry/objects/objectives either on the fly or pre-generated such as in videogames like Diablo 1, 2 and 3. As technology and graphical enhancements become more and more complex, so does the complexity of the worlds that need to be generated. The above video shows just how far procedural generation has come.
Thursday, December 17, 2015
Wednesday, December 9, 2015
Saturday, December 5, 2015
Metallic vs Specular
With technology and the advancement of lighting/shaders comes new ways to do what was used in the past. Real time rendering has gone from no polygons, to flat shaded polygons, to shaded polygons to shaders and materials together. As tech gets better, more options open to developers in making things more accurate.
Take for example the specular map, which comprises of a black and white image where white is the most reflective and black has no reflection.

Left : No specular Right: full specular
As you can see, specular allows for a surface to have a reflection value. Variation of how much light is reflected is in the lightness and darkness of the spec map.
This has been the most common method for most 3D software and game engines to render.
There is a problem though, it lacks proper variance control. Objects are either smooth or rough, flat or reflective and sometimes a mix of both. Take a car that has been in the junkyard for too long for example, the paint would have a reflection (provided it was a glossy paint), the metal will have its own reflection which might not be as bright as the paint, then the metal may be work or have rust that eats away the overall shine. This is an example of layers of variance. Specular is useful for this, but when it comes to more accurate reflection and object roughness, the metallic layer is the direction to go and has now become the standard for real-time graphics developers
A roughness layer from shiny to dull.
A metallic layer from 0-1
So the question is, can a metallic and roughness layer mimic a specular?

The answer is yes.
In fact, developers that are finding the value in metallic/roughness are now preferring it to specular/gloss.
http://forum.unity3d.com/threads/official-specular-vs-metallic-workflow.274612/
Disney use and prefer physically based rendering and metallic/roughness to their older methods due to the accuracy it provides.
https://disney-animation.s3.amazonaws.com/library/s2012_pbs_disney_brdf_notes_v2.pdf
Unreal Engine 4, Unity, Frostbite Engine, Fox Engine and many other modern engines have now moved on to this method. Technology moves and everyone should move with it.
Monday, November 23, 2015
More on Physically Based Rendering.

Tutorial: Physically Based Rendering, And You Can Too!
Here is an excellent breakdown on physically based rendering that goes through a series of materials and surfaces that will greatly effect how a 3D model will look under lighting conditions, from rough rubber to shining metal.
Tutorial: PBR Texture Conversion
Here is the tutorial on the same page that highlights what went into creating the materials
Friday, November 13, 2015
Imperfections for perfection.
A quick set of tips for creating photogrammetric game ready assets in Unreal Engine 4
Imperfection for Perfection.
Thursday, November 5, 2015
Modern game engine breakdown.
Here is an excellent breakdown of all the layers of a modern graphic engine, in this case the engine used for Grand Theft Auto 5 : The Rockstar Advanced Game Engine.
Silly name, unbelievable engine, considering it was designed to run on gaming consoles that had only 512mb of ram or in Playstation 3's case 2x split 256mb ram, this is a very well implemented engine that showcases what can be done with limitations.
Grand Theft Auto 5: Game engine breakdown
Saturday, October 31, 2015
Small teams, big projects
When 3D animators get together in small teams, it may not seem possible or much harder to produce something as amazing as say, Pixar or Dreamworks. Every now and then though a small studio can show that they are very capable.
Just remember, dreaming big should not be limited by small teams.
Monday, October 26, 2015
Render target
Here is a render target mocked up with a few layers of a scene:


This render consists of; colour map, diffuse map, specular map, environment map, a pre-made vignette filter, explosion effect, dust layer and scratch layer.
By adding all the parts together, I can quickly test how the layers can be used, arranged and approved upon. Some post processing such as motion blur will be added in compositing as it is too time consuming to add in the layers when rendering.
Saturday, October 24, 2015
Tuesday, October 20, 2015
Render Testing
Building up the scene for the 5 second advertisement has been full of small struggles and issues, from things rendering slow or incorrectly to overblown light.


I want to add dust particles and a shock wave, but I'm trying to figure out how best to go about it, then onto render passes.
Saturday, October 10, 2015
Facial Animation in Star Citizen
Video demonstration of Star Citizen's Facial system
A small update to the game "Star Citizen" running on CryEngine, this video looks at techniques applied to create a real-time virtual character believable, from blend shapes to bones and rigs, to blood maps and wrinkle maps. Multiple techniques are shown and actively demonstrate how important the sum of the parts are when creating realistic characters.
Here is the final real-time result. Impressive work
Friday, October 9, 2015
Modern day animation in games
Here is an interesting look at animation on a modern gaming engine, in this case Square Enix's Luminous Engine. It demonstrates some of the techniques involved to blend and collide animations to great effect. Seeing what goes on under the hood of a real time gaming engine and how it handles variables will give you an idea of just how much work can go into modern games.
Wednesday, October 7, 2015
Pack shot for advertising
An upcoming project is to design a 5 second advertising short of a product of my choice. I have chosen to create my own imaginary product to sell.
5 Second Short documentation
5 Second Short documentation
Saturday, October 3, 2015
Spare Voxel Octree Global Illumination
Not too long ago, John Carmack of Id software ( now Occulus ) stated that sparse voxel octrees were the start of the future of real time graphics. Years later and this technology is finally coming to fruition, albeit currently in the form of lighting rather than being used directly on models. Sparse voxel octree global illumination as shown in this video demonstrates the incredible potential of this technology in real time applications. This will allow a significant bump in lighting quality, accuracy, lighting grades, shadow quality and light reflection/refraction. Potentially this will allow all light sources to always cast bounced light on the correct surfaces.

The above picture also demonstrates the use of SVOGI very well, showing that light bounces are much more natural than the usual static or baked lighting that usually gets used in most real time applications.

Here is the same scene lit with previous lighting models. As you can see it appears far less natural than the SVOGI image, failing to capture how light bounces, scatters and bleeds into shadow.
Here is some documentation provided by Crytek on SVOGI
Wednesday, September 30, 2015
LODs and texture budget.
When rendering assets in real time for a game engine, there are a number of factors that have to be taken into consideration.
- Polygon budget
- Texture budget
- Texture size and usage
Since texture and polygon counts are finite in comparison to real time rendering, it is necessary for there to be budgets to work with. Say for instance you are working on a game and the texture memory budget is between 512-1024mb. This kind of budget can be filled quickly by textures and as a result texture swapping and level of detail (LOD for short) can be implemented to tackle the issue.
Essentially what LOD does is reduce the detail of objects and textures at a distance. Objects that are closer will have full detail, whereas objects at a distance will have reduced polygon counts and texture sizes. A model may have 3-5k polygons up close, but at a longer distance (50-100 meters) this may be reduced down to 500 polygons as there is no need for such detail. Even the texture, say 2048x2048 might be reduced down to 256x256 as there is no need to see full detailed textures at this distance. In a good engine, the game will hide the distance in which models are swapped from the high and lows. Sometimes there can be multiple distances and multiple levels of detail. In some cases 3d models may be swapped for basic image planes or 2d sprites at a long distance (Often used for trees) to allow more objects on screen with a lower memory footprint.

A good example of an engine that handles LODs well is CryEngine. The model at the front has the highest poly count and the model further back has a reduced texture quality and poly count with very little loss of detail.
Thursday, September 24, 2015
Star Wars oh yes.
Star Wars 360 degree interactive video
Interactive CG sequence for the upcoming Star Wars film. Very cool stuff.
Wednesday, August 26, 2015
Render passes
When a 3d programme such as Maya or 3D Studio Max renders an image, sometimes the results are not quite perfect. The lighting may be off, the colour may be overblown or something may need changing that would require the entire scene to be re-rendered.
There is a solution however in render passes. Essentially a render pass is used to separate the colourmap/shadows/light/specular/diffuse and other effects onto their own separate layer. Rather than the 3D programme combining these effects, tehy can be layered on top of each other in a compositing programme such as Nuke/After Effects/Premier/ and Sony Vegas. This allows for instance, control over the darkness or hue of shadows on their own layer. From here the shadow could be blurred, sharpened or have other effects that cannot be simulated in the 3D programme it was rendered in.
Hypothetically, a scene that has a bright red light in it was passed to the director and he did not like it. Rather than re-render the entire scene the layer that the light was applied to could be tweaked to a more suitable colour. The compositor already has the information and render pass applied in a sequence, so they can adjust it in real-time rather than waiting for it to be processed all over again.
Render passes always come down to control over several elements on layers, rather than one whole element.
An example of separated render passes, each with their own layer then processed and edited on a single image.
Putting 3D into a 2D photo
When applying a 3D model into a 2D photo, there are a few things to consider in order to achieve a look that ensures the object appears to belong to the photograph:
For starters, knowing the height of objects in the world. By measuring things close to where the 3D model will stand, you can get an understanding of the size of your model and how it should be scaled in the world.
Taking reference photos of objects around where the model will stand (for instance a light post or a building) will give you an idea of where a fake object can be placed to mimic things like shadows.
Knowing where the lights are in the scene and which direction they come from is also helpful, as extra light may be needed in the scene to highlight the character/object more.
Environment ball/reflection capture is an accurate way of simulating the light/shadows/colour an environment and the surroundings reflect onto your model.

Some of these effects can be faked by just creating the shadows/reflections and light in programmes like Photoshop and adjusted on an alpha channel. If the programme cannot do a particular task, creating your own effects on new layers may be necessary.
For starters, knowing the height of objects in the world. By measuring things close to where the 3D model will stand, you can get an understanding of the size of your model and how it should be scaled in the world.
Taking reference photos of objects around where the model will stand (for instance a light post or a building) will give you an idea of where a fake object can be placed to mimic things like shadows.
Knowing where the lights are in the scene and which direction they come from is also helpful, as extra light may be needed in the scene to highlight the character/object more.
Environment ball/reflection capture is an accurate way of simulating the light/shadows/colour an environment and the surroundings reflect onto your model.
An example of an environment map.
Adding fake props/ground into the 3d world to use as dummies to capture light/shadow are also very useful. The object/character may be casting a shadow or refracting light onto the scene, but the photo does not understand that the shadow and light should be cast. So the shadow is baked into models and faked
by turning the shadow into a 2D image that can be applied over the image.Some of these effects can be faked by just creating the shadows/reflections and light in programmes like Photoshop and adjusted on an alpha channel. If the programme cannot do a particular task, creating your own effects on new layers may be necessary.
Wednesday, August 12, 2015
HRD Imaging
HDR Imaging, (High Dynamic Range Imaging) is used to allow multiple light levels in a single image composed of 3 or more images.
Essentially with a 3 photo shoot, 1 photo would be taken at a darker level and shadow detail, the next at a regular level to capture the detail and the final at a higher exposure to capture the light detail. Capturing higher light level and darker images removes some of the detail if captured, but when applied in separate layers to a regular photo with all detail this allows the image to retain the brightness and dark levels while still keeping the original pictures detail.

Here is an example of a typical 3 level HDR image. The top left picture being the high light image, the center the regular level and the dark to the right. The lower left is a combination of the 3 top images sampling all 3 to crate one detailed image with the high and low level captures blended in.
Thursday, July 16, 2015
The Production Pipeline
The production pipeline is a chart used to plan out the stages of the creation of any media whether it is a video game, movie or TV show.
The production pipeline is generally a linear map that shows the beginning to the end, usually consisting of pre-production, production and post production. Let's focus though on something like a 3D animated feature film
Pre-production consists of the ideas and build up to creation, generally dealing with story, storyboarding, writing, designs and management of the lead-in to production.Budgets and what people will be working on will be laid out.
Then comes production, the meat of the product itself. This will be modelling, rigging and animation as well as texturing, there may be need for some rendering to test things out.
Finally to put it all together comes post production: Compositing, editing, lighting and rendering. All of these tie the animation together and give it a final pass of quality and ensuring the product comes together as a whole.
Monday, July 6, 2015
Pose to pose vs straight ahead animation
When it comes to animation, there are generally 2 main types of blocking that are used : Pose to pose and straight ahead.
Pose to pose is when the animator selects key moments in the animation to get an idea of where the animation will transition to.
Pose to pose is when the animator selects key moments in the animation to get an idea of where the animation will transition to.
A general pose-to-pose animation
Straight ahead is when the animation is done linear and from frame to frame in order. So 1-2-3-4-5 etc.
Pose to pose offers many benefits over straight ahead, including getting timing right, being able to show the director/animation lead where the animation is going before the in-betweens, gives a better overall direction the animation is going and will save time in the long run. Pose-to-pose is the preferred animation type for 3D animation.
Straight ahead is still useful, but the animator has to have a good idea of what he is leading his animation into. A straight ahead animation may also taper and change shape/size if the animator is not careful about each frame. The method can sometimes be quicker, but will be more work if the animation does not turn out correctly.
Sunday, June 28, 2015
Things to consider for animation
When it comes to animation, there is much more than just drawing frame after-frame and expecting something great to appear. There are generally numerous things to consider when animating any object, person or animal.
For starters, rather than merely guessing how something animates, it is much more useful to reference and study the subject at hand. What your mind assumes to be correct may be missing when if comes down to actually animating. The human eye can and will detect faults as it understands how something moves.
Example video of reference for exercising animation
Let us consider the following when it comes to reference:
Shape/size/weight: It is important to know how heavy an object is as it animates, as a bowling ball on a rope will have more weight than say a tennis ball on a string. Knowing the weight of an object will allow you to judge how fast the object moves, how much time it has to get to a new position and how quickly it can start and stop.
Timing: Timing is key to believability as something that moves too fast or too slow can make an animation seem out of place. Blocking out the time objects move from pose to pose will allow you to get a feeling of how the frames in between will move and where they should be. Knowing how many frames it will take for an object to go from position A to B is important to ensure the objects mass and shape fit.

For starters, rather than merely guessing how something animates, it is much more useful to reference and study the subject at hand. What your mind assumes to be correct may be missing when if comes down to actually animating. The human eye can and will detect faults as it understands how something moves.
Let us consider the following when it comes to reference:
Shape/size/weight: It is important to know how heavy an object is as it animates, as a bowling ball on a rope will have more weight than say a tennis ball on a string. Knowing the weight of an object will allow you to judge how fast the object moves, how much time it has to get to a new position and how quickly it can start and stop.
Timing: Timing is key to believability as something that moves too fast or too slow can make an animation seem out of place. Blocking out the time objects move from pose to pose will allow you to get a feeling of how the frames in between will move and where they should be. Knowing how many frames it will take for an object to go from position A to B is important to ensure the objects mass and shape fit.

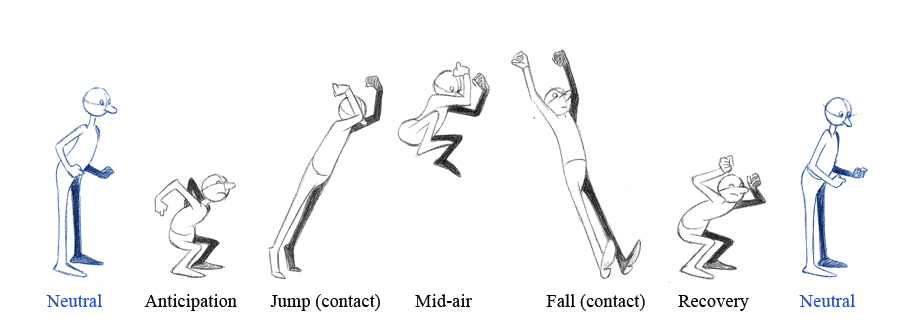
Blocking a star jump
Animation: Finally, understanding key rules of animation such as overlapping, squash and stretch (where necessary) , slow ins and outs, anticipation etc will add to the overall appeal of the animation. Sometimes the character being animated can have all their personality in just their animations alone, without the need for facial expression or even speech. A great lumbering animation will show a character of strength whereas a quick snappy animation can show speed and cunning.
Being able to draw is not 100% necessary in the blocking stages as long as the movement is shown clearly, though for more detailed animation with expression, exaggeration and minor details it certainly helps.
Animation test for Disney's Tarzan
Using references, understanding and researching the material and blocking out animation before diving right into the the final cut is key to ensuring the animation will be successful.
Saturday, June 20, 2015
Animations in games
Here is a great video on animation in games by "Turbo Button"
Animation in action games
It talks about things to consider in action games when they are animated.
Animation in action games
It talks about things to consider in action games when they are animated.
Shaders, let's shed some light in this.
In 3D shaders are extremely important in giving polygons more information and to flesh out an object, rather than it being just a simple flat image.
When a polygon starts out, it has no values or anything overly distinguishable other than often a single colour. Shaders add the details, colouring and material to the polygons and without them they will be mostly lifeless.
The 3 main shaders used are:
Colourmaps
Specular maps
Bump/Normal maps.
Colourmaps are exactly as they are implied. They add colouring to the polygon surface, whether it is a hand painted texture or a photograph. The colourmap sets the overall colour of the object.
Specular Maps are another layer added to the colourmaps to bring out reflective highlights. The highlights are depicted by a black and white image, where the whitest values are the lightest/most reflective and the blackest values are the dullest/ least reflective.
Bump/Normal maps are a shader used to give depth to the colourmap and show details in the surface. A bump map works similar to speculars, in which the whites are higher surface peaks and black is a deeper surface. Normals are a more accurate version of bump maps and allow for greater detail, but rather than using black and white it uses Red, green and blue allowing more angles to be picked up. Generally normal maps are extracted from higher polygon meshes and baked onto a lower poly version giving the illusion of the lower poly model having more detail than it does.
If we were to make a golf ball, we would use a basic white texture for the colourmap, a patterned bump map of small circles repeated and then lightly highlighting the ball with a specular with a light amount of noise/dither to bring out the shine ( or lack of shine ) on the ball. To add even more detail, a secondary colourmap can be added with dirt and marks. The dirt and marks can then be softened/randomised by creating an alpha channel and painting white/black for where the ball should be dirtier/scuffed.
Monday, June 15, 2015
Talking Topology
Topology is a term used in 3D graphics to describe how a mesh is sculpted and the overall cleanliness of the polygons. Essentially it comes down to using polygons correctly and not wastefully, ensuring they are readable, ensuring they are optimised and ensuring there are enough for objects to bend.
By using good topology;
- The mesh is easier to read
- The mesh flows correctly to the shape of the object
- The mesh can use less expensive polygons
- The mesh is easier to unwrap for texturing
- More polygons in the right places will ensure natural movement and bending of polygons
- Less wasted resources
- Something boxy does not need as many triangles as something organic as the shapes are easier to define, so polygons can be spared.
- Models design with animation in mind will work correctly.
- Shapes are correct, contours flow together.

Here is an example from clevermusings.com of good vs bad topology. As you can see the polygons on the left model are poorly placed and do not flow very well, whereas the model on the right is clean and uses polygons correctly to fit the shape of the face without resorting to using more polygons to fill in the gaps.
Monday, May 4, 2015
Fixing what is broken.
Sometimes things do not go as planned or a model does not work as you'd hope, so re-doing it is all you can do to fix the problem.
I was not happy with the initial head, so I re-did it from scratch

I was not happy with the initial head, so I re-did it from scratch
Well within budget and matches what I wanted the character to look like. Happy days.
Wednesday, April 22, 2015
Tuesday, April 21, 2015
Uncharted 4 model
When looking for extremely high quality 3D character models, I often look at the works of Naughty Dog. As technology has improved, they have pushed realism in their models, especially in their Uncharted franchise.
For a real time model, this is amazing.
Polycount 1000 poly challenge
On the polycount forum, there is a thread that allows creators to show their low-poly modelling skills. By sticking with a low poly count, the creator can give more room for processing power and texture space, which is essential in game development.
Some of the models on display are fantastic and are even viewable via Unity web plugin.
Polycount Forum
Check it out.
Some of the models on display are fantastic and are even viewable via Unity web plugin.
Polycount Forum
Check it out.
Character Modelling, Rigging and animation project.
For my current project, I will be creating modelling and rigging a character for animation.
Firstly the character is designed:


Firstly the character is designed:
Front side and head profiles are created, with these a 3D mesh is extruded to create the shapes.
Using the 4 windows of Maya, I extrude a square primitive from the torso outwards, adjusting the vertex loops to fit the shape of the 2D profiles, while ensuring the minimum amount of triangles. Quads are preferred when creating models.
Using Mudbox, I create a higher polygon model from the low poly base model, this high poly model will be extracted as a normal map to be applied as a difference on the Low poly model, giving the illusion that a low poly model is displaying the same amount of detail as the high poly model.
Tuesday, March 31, 2015
Blur Animation Reel
Blur studios have been around for a very long time and have proven themselves time and time again to be masters of CG. Generally focused on cut-scenes / intros / outros, they always impress by making scenes that give the viewer an impressive display of effects, animation and story.
Tuesday, March 17, 2015
Procedurally generated animation
Generally with animation, keyframing and ensuring your character/object looks right when they move and ensuring they blend together. With procedurally generated animation, all it takes is a rig with calculated dynamics and motions and all this becomes natural.
Friday, March 6, 2015
CryEngine physics system and rigging for Characters
Sometimes engine creators incorporate tools that make it much easier to create character rigs so game developers have better control with faster results.
Cryengine's physicalized character creation system is an exceptional example of this.
Cryengine's physicalized character creation system is an exceptional example of this.
Tuesday, March 3, 2015
UNREAL Engine 4 Now Free + Showcase reel
Unreal Engine 4 Free Edition
The popular game development platform Unreal Engine 4 has now been released free, along with a reel of technology and game demonstrations.
The popular game development platform Unreal Engine 4 has now been released free, along with a reel of technology and game demonstrations.
As one of the best engines available on the market, this is worth your time.
Saturday, February 28, 2015
Hyper real CG
Hyper Real CG gallery
Prepare to be inspired.These are some of the most realistic CG pics I have ever seen.
Monday, February 23, 2015
Fun with work
One of the most important things with work is to always have a bit of fun with it too. A YouTube animator by the name of "Hyper" demonstrates that playing around can be just as fun as serious work
Have fun!
Tuesday, February 17, 2015
Sunday, February 15, 2015
Real time Ray-Tracing
Ray tracing is usually an expensive rendering solution, but here Nvidia has made ray-tracing possible in real-time. When this is in gaming, we will see a massive boost to realism when it comes to reflections and materials.
Subscribe to:
Posts (Atom)